

Buying new furniture is exciting — until it shows up and does not fit. Maybe the sofa blocks the doorway, the dining table makes the chairs impossible to pull out, or the wardrobe simply will not make it up the stairs. If you want to avoid those painful moments, learning how to measure a room for furniture is the single most important step you can take before spending a cent.
This guide walks you through every measurement you need: the room itself, the furniture footprint, functional clearance, delivery paths, and room-specific guidelines for living rooms, bedrooms, and dining rooms. By the end, you will know exactly what fits, what works, and what to watch out for before you buy.
What You Need Before You Start Measuring
You do not need fancy gadgets to do this well. A few simple tools are all it takes to measure a room accurately and confidently.
Essential Tools
- A steel tape measure (25 feet is ideal for most rooms)
- Pencil and notepad, or a notes app on your phone
- A room sketch — even a rough hand-drawn outline is enough
- A friend to hold the other end of the tape in larger rooms
Pro Tip: A laser distance measurer is a useful upgrade if you measure rooms often. It lets you work alone and reads from wall to wall in seconds. However, a basic tape measure works perfectly for this task.
Optional but Helpful
- Graph paper for drawing a scaled floor plan (1 square = 1 foot works well)
- A room planner app such as RoomGPT, Planner 5D, or IKEA Place
- Painter’s tape to mark furniture outlines on the floor before buying
- Your phone camera to photograph the room from all four corners
Taking a photo of each wall from the opposite corner is a simple habit that saves you from missing details like outlets, vents, or trim that could affect furniture placement.
Step-by-Step: How to Measure a Room for Furniture
Follow these steps in order. Each one builds on the last and together they give you a complete picture of your space.
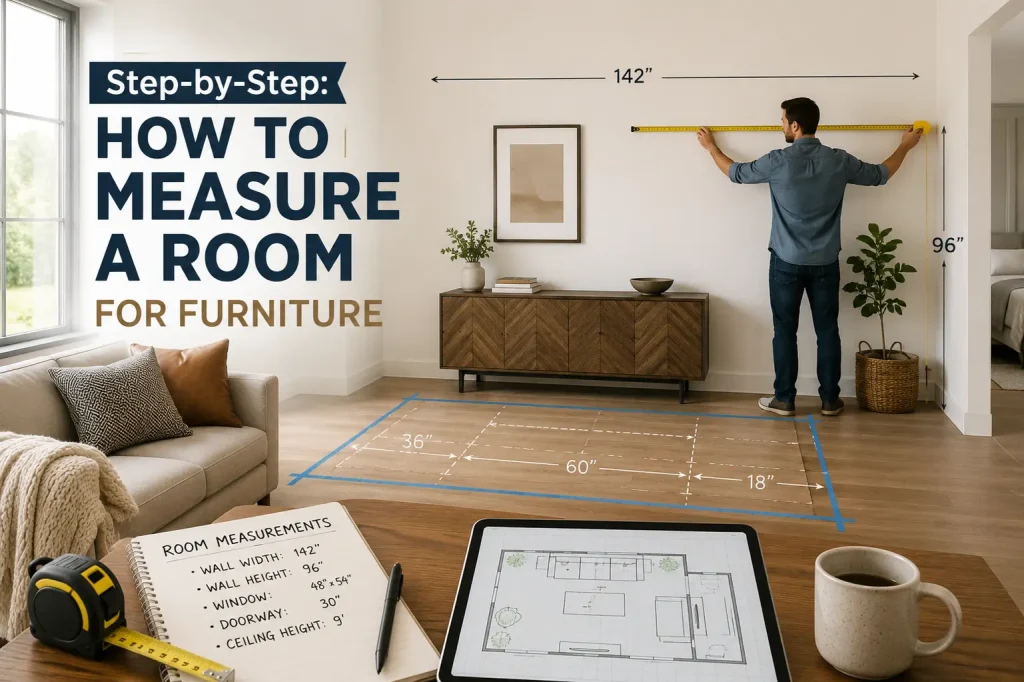
Step 1: Measure the Room’s Length and Width
Start with the biggest numbers. Run your tape measure along the floor from one wall to the opposite wall and write down the length. Then measure the adjacent walls for the width. These are your room’s outer boundaries.
Important: measure at three different heights — low (near the floor), middle (around waist height), and high (near the ceiling). Walls are not always perfectly straight, especially in older homes. Use the smallest number you get at each point. This gives you a conservative, accurate boundary to plan within.
Write both measurements down. Then multiply them together to get the room’s square footage if you need it for a broader layout reference.
Step 2: Measure the Ceiling Height
Ceiling height matters more than most people expect. It affects whether tall furniture like bookcases, armoires, and display cabinets will fit, and it also determines how heavy or open the room feels.
- Standard ceiling height: 8 feet (2.4 m)
- For furniture over 7 feet tall, measure ceiling height first — always
- Also note any beams, soffits, or light fixtures that lower the effective ceiling
Step 3: Map Every Fixed Feature on Each Wall
Before you plan what goes where, you need to know what is already fixed and immovable. On each wall, measure the location and dimensions of every architectural feature.
Doors: Measure the door width, the height, and — crucially — which direction the door swings. A door that swings inward claims floor space and blocks furniture from sitting against that wall.
Windows: Note width, height, and the distance from the floor to the window sill. This determines whether tall furniture can sit in front of a window without blocking light or airflow.
Electrical outlets: Mark where outlets are. Low outlets may end up behind furniture, requiring you to plan cable access. Your TV unit, desk, and sofa table all need outlet access.
Radiators and vents: These need to stay clear. Blocking a radiator or HVAC vent with a sofa or cabinet reduces heating/cooling efficiency and can damage the furniture over time.
Fireplaces and built-ins: Fixed features that anchor the room layout. Measure from each corner to the feature and from the feature to the next wall.
Designer tip: Measure from corner to corner for each wall and treat each architectural feature as its own segment. For example: corner to door = 18 inches, door width = 32 inches, door to window = 24 inches, window width = 36 inches, window to corner = 20 inches. This breakdown is far more useful than just the overall wall length.
Step 4: Sketch Your Floor Plan
Draw a simple outline of the room on paper. It does not need to be perfect — just roughly proportional. Add all the features you measured in Step 3. Label each measurement.
If you want a digital version, free tools like Planner 5D, Roomstyler, or Floorplanner let you enter your measurements and drag and drop furniture to scale. This is especially useful for testing multiple layouts before committing to anything.
Step 5: Measure Doorways and Access Points
This step is one most people skip — and it leads to some of the most stressful furniture experiences imaginable. A sofa that fits the room perfectly is useless if it cannot physically enter the room.
Measure the interior width and height of every door, hallway, staircase landing, and turn that the furniture must travel through from the front door to its final position.
- Door interior width (between the door stops, not the frame edges)
- Door height (floor to the top of the opening)
- Hallway width from wall to wall at the narrowest point
- Staircase width and ceiling height above the stairs
- Width of any landing where a 90-degree turn is required
- Elevator interior dimensions if you live in a multi-storey building
For large pieces — sofas, mattresses, dining tables, tall cabinets — also calculate the diagonal measurement. When a piece cannot pass through a doorway upright, it may still fit on its side or at an angle. The diagonal depth of a sofa, for example, is what determines whether it can make it through a standard door.
Quick calculation: To find diagonal depth, use: square root of (height squared + depth squared). If the diagonal depth is less than the door width, the piece can enter on its side.
Understanding Furniture Dimensions and What They Really Mean
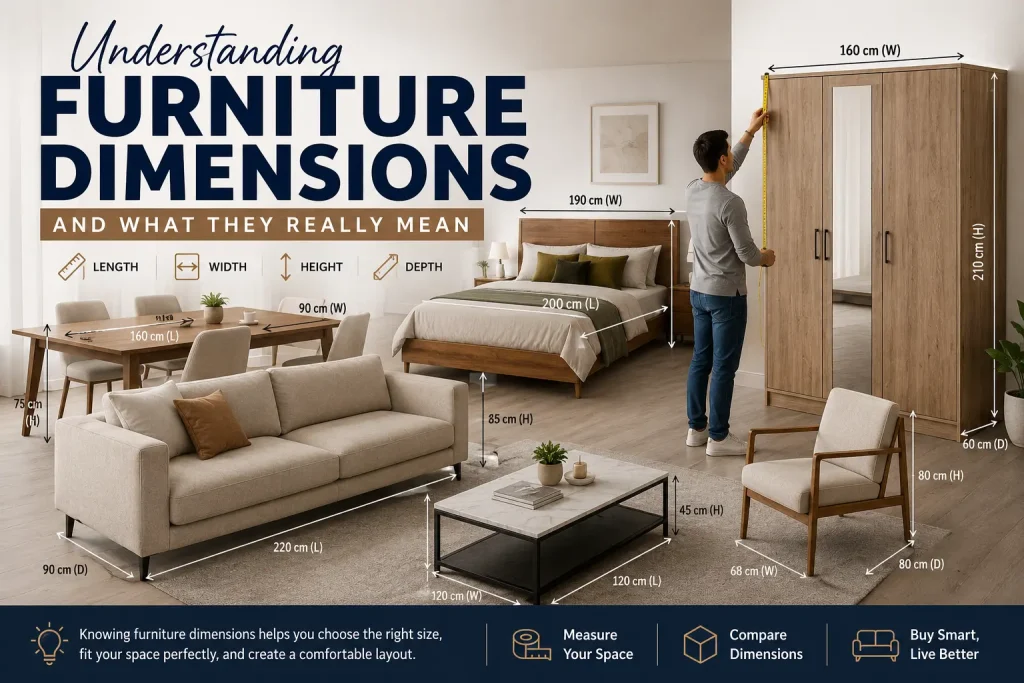
Product listings always show three numbers: width, depth, and height. But these do not tell the whole story. Here is what each one actually means in a real room.
Width, Depth, and Height — Defined Clearly
Width: The measurement from one side to the other. For a sofa, this is how long it runs along the wall. For a table, it is the widest horizontal measurement.
Depth: The measurement from front to back. This is how far into the room the piece extends. Depth is often the measurement that surprises people — a sofa might look slim online but extend 40 inches into a small room.
Height: Floor to the top of the piece. Critical for tall furniture near low ceilings, or for matching visual proportions with windows and doorways.
Footprint vs. Functional Space — The Difference That Changes Everything
The footprint is the floor area a piece of furniture physically covers. But functional space is the total area the furniture needs to work properly — and this is almost always larger than the footprint.
- A reclining chair needs 12–18 inches of clearance behind it to recline fully
- A dresser needs space equal to its drawer depth (usually 18–24 inches) directly in front of it
- A dining chair, when pulled out to sit down, needs about 24 inches of space behind it
- A sofa bed or sleeper sofa needs its full extension length in front of it — often 6+ feet when fully open
- Swivel chairs and office chairs need a full circle of clear space around them
This is the most commonly missed measurement mistake. Always mark the functional space on your floor plan, not just the furniture footprint.
Clearance Guidelines: How Much Space to Leave Around Furniture
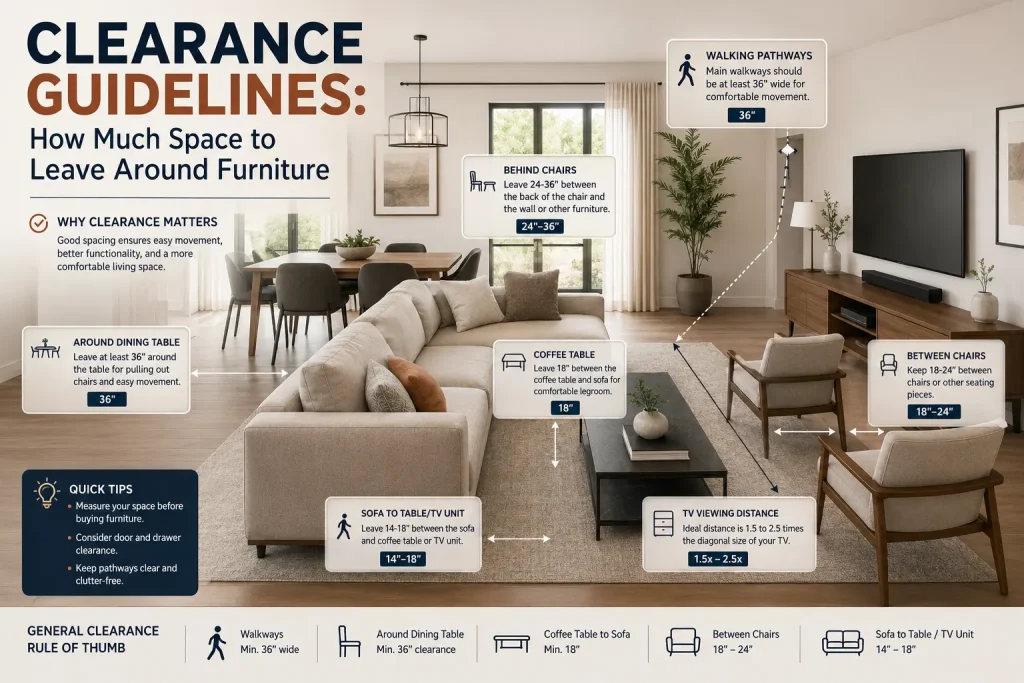
Clearance is the open floor space you deliberately leave around furniture. It is what keeps a room feeling functional rather than crowded. Here are the standard guidelines interior designers use:
| Furniture / Area | Recommended Clearance | Why It Matters |
| Main walkway / traffic path | 36 inches minimum | Enough room to walk without squeezing past furniture |
| Sofa to coffee table | 16–18 inches | Easy to reach items and stand up comfortably |
| Dining table to wall/other furniture | 36–48 inches | Allows chairs to pull out fully and people to pass behind |
| Around bed (sides) | 24–30 inches | Space to walk, make the bed, and access nightstands |
| In front of dresser/wardrobe | Drawer depth + 6 inches | Drawers and doors open without hitting anything |
| TV to seating area | 8–10 feet (optimal) | Comfortable viewing without neck strain |
| Desk chair pull-back space | 30–36 inches | Enough to push back and stand up |
| Sofa to opposite wall | 6–10 feet (living rooms) | Keeps the room proportional and social |
These are starting points, not rigid rules. In a smaller room, you may work with slightly tighter clearances — but never drop below 24 inches on the main traffic path, or the room will feel genuinely uncomfortable to move through.
How to Measure for Specific Rooms
Each room in the home has its own layout logic. Here is what to focus on when measuring for furniture in the three most common rooms.
Living Room Measurements
The living room usually holds the largest pieces of furniture in the home, so getting measurements right here matters most.
- Measure the wall where the sofa or sectional will sit, and the full length available along that wall
- Note how far into the room the sofa will extend (depth) and leave 16–18 inches between the sofa and the coffee table
- Measure from the seating area to the TV wall — 8 to 10 feet is the comfortable viewing range for a 55–65 inch screen
- For a sectional, measure both walls it will run along and leave at least 36 inches of walkway to the room’s exit
- Check the depth of any alcoves, bay windows, or recesses where furniture might sit
Bedroom Measurements
The bed is the anchor of the bedroom layout, so start there and work outward.
- Measure the wall where the bed’s headboard will go, and confirm the bed frame plus headboard fits with at least a few inches of clearance on each side
- Leave 24–30 inches along both sides of the bed so you can walk, make the bed, and access nightstands
- Measure the space at the foot of the bed — at least 24 inches is needed to walk through comfortably
- For a wardrobe, measure both its footprint and the door swing or sliding clearance — a standard hinged wardrobe door needs 18–24 inches to open fully
- For a dresser, note the drawer depth and make sure there is that much clear space in front of it
- Measure ceiling height if you are considering a loft bed, bunk bed, or tall wardrobe
Dining Room Measurements
The dining room is all about the relationship between the table, the chairs, and the space around them.
- Measure the room from wall to wall, then subtract 36–48 inches on each side for chair pull-out space and a walking path — the remaining space is your maximum table size
- A round table works better in a square room; a rectangular table suits a longer, narrower room
- Each dining seat needs approximately 24 inches of table width to feel comfortable
- For a buffet or sideboard along the wall, measure the available wall length and leave at least 18 inches in front of it for access
- If you have a chandelier or pendant light, measure where its center is — your table should sit centered below it
Home Office Measurements
Often overlooked but increasingly important, the home office has its own specific demands.
- Measure the desk footprint and leave 30–36 inches behind the chair for pull-back space
- If you have a monitor arm or dual screens, note how far the setup extends from the desk’s back edge
- Measure outlet positions before deciding on desk placement — cable management becomes a nightmare if the desk ends up far from power
- For a filing cabinet or bookcase, measure both its width and whether the drawers or doors have adequate clearance
How to Use Painter’s Tape to Test Furniture Placement
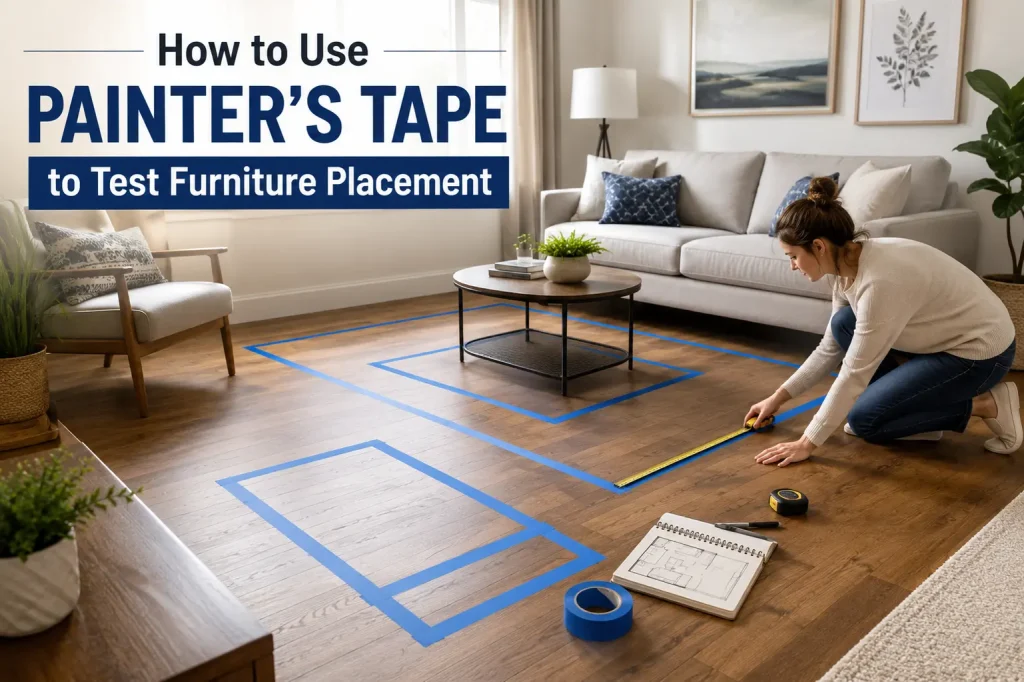
This is one of the most underrated techniques for planning a room layout, and almost no one thinks to try it. Before you buy a piece of furniture, use painter’s tape to mark out its exact footprint on the floor.
Use the furniture’s width and depth measurements to mark a rectangle on the floor in the exact spot where the piece would go. Then live with it for a day or two. Walk around it, see how the room feels, test whether the traffic flow still works, and check if doors and drawers would have enough clearance.
This costs nothing and prevents expensive returns. If the tape outline feels cramped or blocks a natural walking path, the piece is too big for that spot — no matter how good it looked in the showroom or online.
Common Measuring Mistakes and How to Avoid Them
Even people who know they should measure before buying still make the same mistakes. Here are the most frequent ones — and how to sidestep them.
Measuring Only the Room, Not the Delivery Path
The furniture has to reach the room before it can live there. Always trace the full delivery route from the front door to the final placement spot, measuring every door, hallway turn, and staircase along the way.
Forgetting Functional Space
A recliner that physically fits in the corner but cannot recline without hitting the wall is not really fitting. Always plan for how furniture behaves when in use, not just when it is sitting still.
Measuring the Door Frame Instead of the Opening
The usable door width is the space between the door stops (the strips of wood the door rests against when closed), not the width of the outer frame. This is typically 1.5 to 2 inches narrower than the frame itself. Use the interior opening measurement when comparing it to furniture dimensions.
Not Accounting for Baseboards and Trim
Baseboards, crown molding, and wall trim can reduce the available depth against a wall by 0.5 to 1.5 inches. If you are placing a tall bookcase or wardrobe flush against a wall, check whether the trim will push it forward and affect clearance in front.
Assuming the Product Photo Reflects the True Size
Furniture is often photographed in large, styled spaces with wide-angle lenses that make everything look proportionally smaller. Always go by the numbers, not the photo. A sofa that looks modest in a lifestyle image might be 105 inches wide.
Measuring Once and Trusting It
Measure every key dimension at least twice, ideally from both ends. Check that your room sketch adds up — if the wall measures 12 feet but your segments total 14 feet, something went wrong.
Measuring for Furniture Delivery: The Full Checklist
Before confirming any purchase of a large furniture piece, run through this delivery access checklist:
- Measure the front door interior width and height
- Measure every interior door from the entrance to the destination room
- Measure hallway widths at the narrowest points
- Measure any 90-degree turns — note the landing space before and after the corner
- For multi-storey homes: measure staircase width, ceiling height above stairs, and banister clearance
- For apartments: measure elevator door width, elevator interior, and the hallway outside the elevator
- Calculate the diagonal depth of any large sofa, bed, or cabinet
- Check the packaging dimensions in addition to the furniture dimensions — packaging adds inches on all sides
Useful Tools and Apps for Room Planning
If you want to go beyond a hand-drawn sketch, several free and low-cost tools make room planning much easier.
Planner 5D: A free web and mobile app with drag-and-drop furniture in realistic scale. You can enter your exact room measurements and test layouts before buying.
IKEA Place: Uses augmented reality to place IKEA furniture in your actual room through your phone camera. Excellent for visualizing scale in your real space.
Roomstyler 3D Home Planner: A browser-based planner that lets you draw a room to scale and fill it with furniture from multiple brands.
Graph paper and pencil: Old-fashioned but completely reliable. Use a scale of 1 square per foot and cut out scaled furniture shapes to move around the plan.
Painter’s tape on the floor: The most tactile method — outlined above — that lets you physically experience the size of a piece before buying.
Conclusion
Knowing how to measure a room for furniture is not just about avoiding awkward returns. It is what gives you the confidence to make good decisions about your space — decisions that feel right not just on delivery day but every day you live with the furniture.
Start with the room dimensions, move to the fixed features, plan clearance around every piece, test your layout with tape on the floor or a planning app, and trace the delivery path before you buy. Follow that sequence and the process becomes straightforward rather than stressful.
The time you spend measuring is always less than the time and cost of dealing with a furniture piece that does not fit. Take the measurements, make the sketch, and shop with confidence.
You May Also Like It:
Basic Coding Concepts – Beginners Guide
Simple Coding Projects for Beginners
Huffman Coding – The Core of Data Compression Explained